A rain garden captures runoff, filters water, and turns soggy spots into thriving habitat.
If you have ever watched water race across a driveway, pool near a downspout, or leave a muddy patch in the yard, you already understand why a rain garden matters. I’ve planned and helped shape a number of rain gardens over the years, and the best ones always do the same thing: they slow stormwater, sink it into the ground, and look good doing it. In this guide, I’ll walk you through how to create a rain garden the right way, from choosing the best spot to picking plants that can handle both wet and dry days.
What a rain garden is and why it works
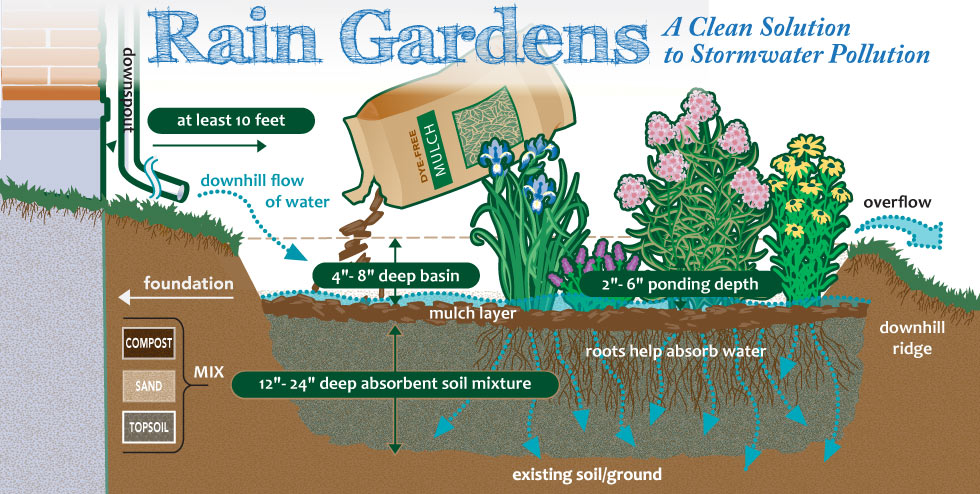
A rain garden is a shallow planted area that catches runoff from roofs, patios, driveways, and lawns. Instead of letting water rush into storm drains, the garden holds it briefly so it can soak into the soil. That helps reduce flooding, cuts erosion, and lowers pollution in nearby streams and lakes.
Think of it like a sponge with flowers. The soil, roots, and plants all work together to slow water down and clean it as it moves through. In many places, especially where heavy rain comes fast, a rain garden is one of the simplest green infrastructure tools a homeowner can build.
The idea is backed by solid stormwater science. University extension programs, state environmental agencies, and watershed groups have long promoted rain gardens because they reduce runoff volume and improve water quality when they are built and maintained correctly.
Benefits of creating a rain garden
A well-planned rain garden does more than look nice. It solves real drainage problems and brings a few extra wins along the way.
Some of the biggest benefits include:
- Less standing water in problem areas
- Reduced runoff from roofs and hard surfaces
- Better soil drainage over time
- Less erosion near downspouts and slopes
- Cleaner stormwater before it reaches creeks or drains
- More habitat for pollinators and birds
- Lower need for constant lawn care in wet spots
I’ve seen homeowners get the biggest surprise from the look of the finished space. What started as a mud zone often becomes one of the most attractive parts of the yard. That said, the real value is practical first and pretty second.
How to create a rain garden step by step
1. Watch where water goes
Before you dig anything, observe your yard during and after rain. Look for places where water flows, pools, or cuts channels in the soil. A rain garden should be placed where it can catch runoff without sending water toward your foundation or a neighbor’s property.
A common mistake is choosing the lowest spot just because water collects there. Sometimes that area stays wet too long or sits too close to the house. The best rain garden location is usually downhill from the source of runoff, but still safely away from structures, septic systems, and utility lines.
2. Test the soil
Soil drainage is one of the most important parts of how to create a rain garden. If the soil drains too slowly, water may sit for days. If it drains too fast, the garden may not hold water long enough to do its job.
A simple test helps. Dig a hole about 6 inches deep, fill it with water, let it drain, then refill it and see how fast the water drops. In many guides, a drain time of about 1 to 2 inches per hour is considered workable for a rain garden. If drainage is slower, you may need to amend the soil or choose a different site.
3. Size the garden correctly
A rain garden does not need to be huge, but it should be sized for the amount of roof or hard surface it drains. A common rule is to make the garden about 10 to 20 percent of the drainage area, depending on soil type and rainfall patterns. For many homes, that means a garden somewhere between a small patio bed and a modest landscape feature.
If you are unsure, start with the area that receives the most obvious runoff, such as a downspout or driveway edge. I often tell people not to chase perfection on the first build. A right-sized, well-placed garden usually performs better than a fancy but poorly located one.
4. Mark the shape and depth
Most rain gardens are shallow, gently curved, and shaped like a bowl with a flat bottom. That shape helps spread water evenly and keeps it from carving a path through the middle. The depth is often around 4 to 8 inches, though local conditions can change that.
Use a hose, rope, or garden lime to outline the shape before digging. This gives you a chance to step back and make sure it fits the space. A good rain garden should look like part of the landscape, not like a hole someone forgot to finish.
5. Dig and prepare the basin
Once the layout is set, remove sod and dig the basin to the planned depth. Save the topsoil if it is healthy, because you may be able to mix it back in later. The center of the garden should be level so water spreads out evenly.
Then loosen the bottom soil. This helps roots grow and improves infiltration. In clay-heavy yards, I have found that this step matters a lot more than people expect. If the subsoil is compacted, even a beautiful planting plan will struggle.
6. Improve the soil mix
Many rain gardens need a soil blend that drains well but still holds enough moisture for plants. A common mix includes sand, compost, and native topsoil. The exact ratio depends on your local soil, but the goal is simple: create a loose, fertile bed with good structure.
Avoid overloading the garden with rich compost. Too much organic matter can make the soil sink over time and may hold too much water. Good rain garden soil should feel crumbly, not sticky.
7. Add an overflow area
Every rain garden needs a safe place for extra water to go during heavy storms. This overflow point is often a shallow swale, rock spillway, or low edge designed to carry excess water away from the house. It protects the garden from washing out when rain is stronger than expected.
This is one of those details people skip, and then they regret it after the first big storm. Think of the overflow as a pressure valve. It does not get used every day, but when it is needed, it can save the whole project.
8. Choose the right plants
Plants are the heart of a rain garden. The best choices are usually native plants that can handle both wet feet and dry spells. They tend to have deeper roots, better resilience, and less need for fertilizer or extra water once established.
A strong planting plan often includes:
- Plants for the wet center
- Plants for the middle zone
- Plants for the drier outer edge
Examples may include sedges, switchgrass, coneflower, joe pye weed, black-eyed Susan, swamp milkweed, and certain native irises, depending on your region. The exact species should match your USDA hardiness zone, soil, sun exposure, and local ecology.
9. Plant in layers
A good rain garden should look full but not crowded. Place taller plants toward the back or center, medium plants in the middle, and shorter plants near the edges. Grouping plants in clusters usually looks more natural than placing everything in rows.
Mulch lightly after planting, but do not bury the crowns of the plants. I learned early on that too much mulch can smother new roots and trap too much moisture. A thin layer of shredded hardwood mulch is often enough.
10. Water it during the first season
Even though rain gardens are designed to catch rain, new plants still need help while roots establish. Water deeply during dry spells in the first year, especially after planting. After that, the garden should need much less care.
The first growing season is the hardest part. Once plants settle in, the garden usually becomes more self-sufficient. That is part of what makes a rain garden such a smart long-term choice.
Best plants for a rain garden
The best plants for a rain garden depend on climate and soil, but native species are usually the safest bet. They are adapted to local rain patterns, pests, and temperatures. They also support bees, butterflies, and birds better than many ornamental imports.
Here are good plant types to consider:
- Moisture-loving grasses like little bluestem and switchgrass
- Perennials like swamp milkweed and coneflower
- Flowering plants like black-eyed Susan and cardinal flower
- Edge plants like asters and native sedges
- Shrubs in larger gardens, such as winterberry or buttonbush
A helpful trick is to think in zones. The bottom of the rain garden stays wet longest, so it needs the most water-tolerant plants. The outer edge dries faster, so it can hold plants that prefer average garden soil.
Common mistakes to avoid
I have seen a few rain garden problems repeat again and again. Most are easy to prevent if you plan ahead.
Watch out for these mistakes:
- Placing the garden too close to the foundation
- Skipping the soil drainage test
- Making the basin too deep
- Forgetting an overflow outlet
- Using plants that hate wet feet
- Adding too much mulch
- Putting the garden in full shade when the chosen plants need sun
One of the most common errors is expecting a rain garden to solve every drainage issue by itself. It works best as part of a larger drainage plan that may also include downspout extensions, grading fixes, or permeable surfaces.
Maintenance tips for long-term success
A rain garden is not high-maintenance, but it is not no-maintenance either. The first year usually needs the most attention, and after that the work drops off a lot.
Basic care includes:
- Checking plants after heavy rain
- Pulling weeds before they spread
- Replacing dead plants during the first season
- Refreshing mulch as needed
- Watching for sediment buildup near inlets
- Trimming plants in late winter or early spring
If the garden starts holding water for more than 48 hours after a normal rain, that can signal a drainage issue. If that happens, check for compacted soil, clogged mulch, or sediment buildup. A small fix early is much easier than a big repair later.
How to create a rain garden on a slope or in a small yard
Not every yard is flat, and not every rain garden has lots of space. The good news is that how to create a rain garden can still work in tight or sloped areas if you adjust the design.
For sloped yards:
- Place the garden on a gentle contour
- Build a level basin
- Add a small berm on the downhill side
- Use a safe overflow path
For small yards:
- Capture runoff from one downspout only
- Keep the shape compact and simple
- Use vertical layering with shrubs and smaller perennials
- Focus on beauty and function in the same bed
Small rain gardens can be surprisingly effective. Even a modest basin near a downspout can make a big difference in how water moves across your property.
How to create a rain garden that fits your local climate
Climate matters a lot. In hot, dry regions, you may need deeper-rooted native plants and more help during establishment. In wet regions, drainage and overflow design become even more important. In cold climates, freeze-thaw cycles can affect soil and plant survival.
Before planting, check local extension guidance, native plant lists, and watershed recommendations. That extra research pays off. In my experience, the most successful rain gardens are the ones built with local conditions in mind, not copied from a generic diagram.
Why rain gardens support the environment
Rain gardens are a small project with a wide impact. They help keep pollutants out of waterways, reduce strain on storm drains, and restore a bit of natural water movement in developed areas. They also create little pockets of habitat in places that would otherwise be just lawn or pavement.
This matters because runoff from homes can carry oil residue, lawn chemicals, pet waste, and sediment. A rain garden helps slow and filter that flow. It is a simple way to make a yard more resilient and more alive.
Frequently Asked Questions of how to create a rain garden
How deep should a rain garden be?
Most rain gardens are about 4 to 8 inches deep, though local soil and drainage conditions can change that. The goal is to hold runoff long enough for it to soak in, not to create a pond.
Can I build a rain garden near my house?
It is better to keep it a safe distance from the foundation, usually several feet away or more depending on grading and local rules. Water should always move away from the house, not toward it.
Do rain gardens attract mosquitoes?
Not if they drain properly. A well-built rain garden should empty within about 24 to 48 hours, which is too fast for mosquitoes to breed in large numbers.
What kind of plants work best in a rain garden?
Native plants with deep roots usually work best because they handle wet and dry periods well. Pick species based on your soil, sun, and region, and place the wettest-tolerant plants in the center.
How much maintenance does a rain garden need?
Most of the work happens in the first year while plants are getting established. After that, routine weeding, mulching, and occasional plant replacement are usually enough.
Conclusion
Learning how to create a rain garden is really about working with water instead of fighting it. When you choose the right spot, build the basin well, and plant with care, you get a landscape feature that solves drainage problems and adds beauty at the same time. It is one of those rare home projects that helps your yard and the environment together.
If you are dealing with runoff, a soggy patch, or a downspout that dumps too much water in one place, this is a smart project to try. Start small, use local plant advice, and build for your actual soil and weather. If you found this guide helpful, explore more native planting ideas or leave a comment with your rain garden plan.