Start seeds indoors early to grow strong seedlings, save money, and extend your growing season.
I have started hundreds of seed trays over many seasons and tested methods that work. This seed starting guide shares clear steps, simple tips, and real-world fixes. Read on to learn when to start, what to use, how to care for seedlings, and how to avoid common mistakes.
Why start seeds? Benefits and limits of this seed starting guide
Starting seeds gives you choice, saves money, and extends harvest time. Home-started plants often beat store-bought transplants in health and variety. This seed starting guide helps you pick the right seeds and schedule for your zone.
Limits matter too. Some crops do not like transplanting and do best sown direct in the ground. This seed starting guide explains which plants to start indoors and which to sow outside. Use this guide to get strong starts and avoid wasted time.
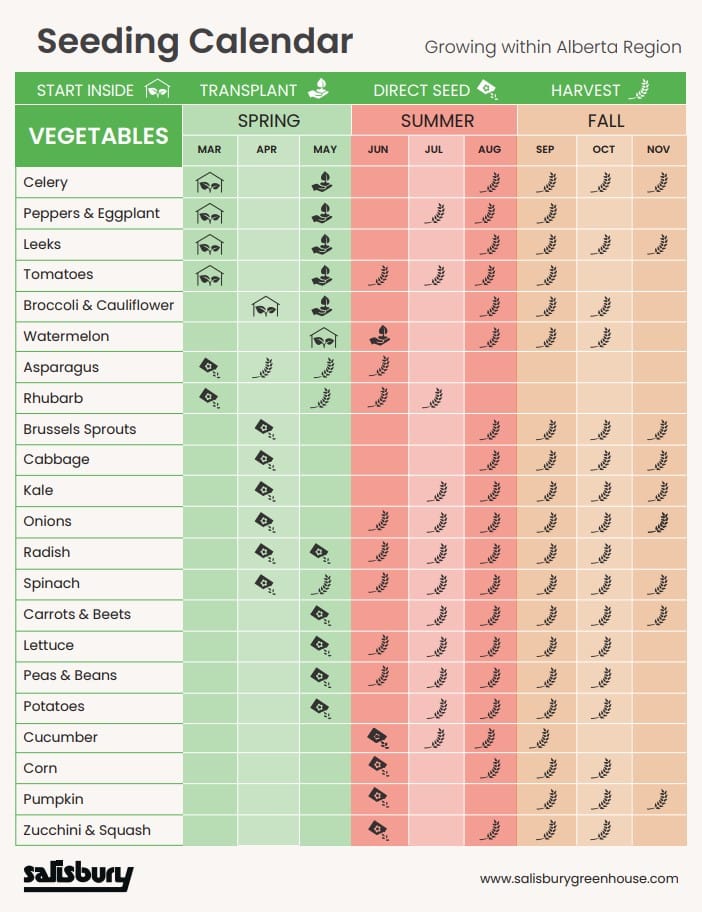
When to start seeds: timing, zones, and frost dates
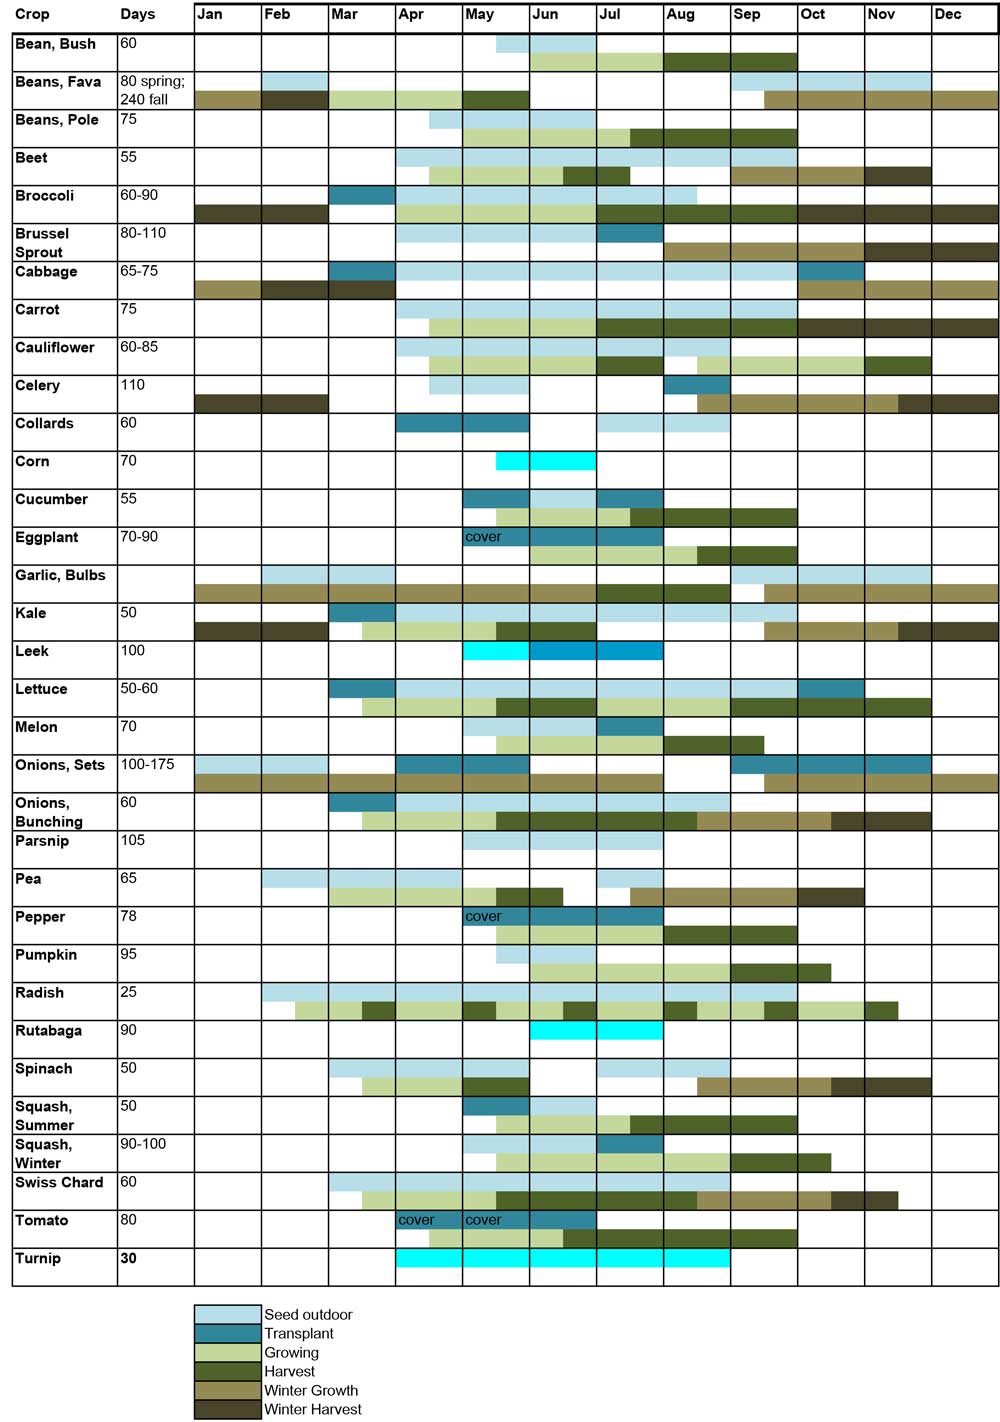
Timing is the top factor in seed success. Know your last frost date. Count back the weeks listed on the seed packet. Most vegetables need 4 to 10 weeks indoors before transplanting.
People also ask: When should I start seeds indoors?
Start seeds indoors based on the seed packet. Typically start 4 to 8 weeks before the last frost for many veggies. Peppers and tomatoes often need 6 to 10 weeks.
People also ask: Can I start seeds too early?
Yes. Starting too early causes leggy plants and long waits under lights. Aim for the period the packet suggests and adjust for your zone.
Use these quick rules:
- 6 to 8 weeks before last frost for most vegetables and annuals.
- 8 to 10 weeks for peppers and warm-season crops.
- 2 to 4 weeks for fast growers like basil and cosmos.

What you need: tools and supplies for the seed starting guide
Gather simple gear. Good supplies make seed starting easy and repeatable. Here is a basic list for this seed starting guide.
- Seed trays or pots. Small cells or biodegradable pots work well.
- Seed-starting mix. Use a light, sterile mix that drains well.
- Grow lights. Full-spectrum LEDs give good light without heat.
- Heat mat. Useful for warm-loving seeds like peppers.
- Spray bottle or fine mister. Gentle watering keeps soil from washing seeds away.
- Labels and marker. Write seed name and date on each tray.
- Tray with drainage. Catch extra water and avoid mess.

Step-by-step seed starting guide: sowing to transplant
Follow these steps in this seed starting guide for steady success.
- Prepare the mix.
- Fill trays with seed-starting mix. Firm lightly. Do not compact.
- Sow seeds at the right depth.
- Use the packet depth rule. A good rule is seed size equals depth. Tiny seeds sit on the surface.
- Water gently.
- Mist or water from the bottom. Keep soil moist but not soggy.
- Provide warmth.
- Use a heat mat for warm seeds. Aim for 65 to 75°F for most crops.
- Give light.
- Place lights 2 to 3 inches above seedlings. Keep lights on 12 to 16 hours daily.
- Thin and feed.
- Thin to one strong seedling per cell. Use a weak fertilizer after true leaves appear.
- Harden off.
- Move seedlings outdoors for a week. Start with an hour of shade and add time daily.
- Transplant.
- Plant on a calm day or in the evening. Water in well and protect from strong sun.
This seed starting guide helps you space tasks and track seed age. Keep notes on each batch. It helps you learn what works.
Soil, water, light, and heat: the science made simple
Seedlings want steady moisture, bright light, and a warm root zone. Use a sterile seed-starting mix to avoid disease. Avoid garden soil; it holds too much weight and can carry fungi.
Water tips:
- Keep the surface damp. Do not let trays dry out.
- Water from the bottom for gentle, even moisture.
- Use room temperature water to avoid shock.
Light tips:
- Seedlings need strong light to stay short and sturdy.
- LEDs work well. Keep the bulbs close and raise them as plants grow.
Heat tips:
- Warmth speeds germination. A heat mat works for peppers and tomatoes.
- Once seedlings sprout, cooler temps (60–68°F) slow legginess.

Common problems and how this seed starting guide helps you fix them
Even with care, issues arise. This seed starting guide shows fixes that really work.
- Damping off
- Cause: fungal infection in wet, cool soil.
- Fix: use sterile mix, good air flow, and avoid overwatering.
- Leggy seedlings
- Cause: too little light or too much heat.
- Fix: add brighter lights and lower temperature overnight.
- Yellow leaves
- Cause: overwatering or poor drainage.
- Fix: cut back watering and check mix texture.
- Slow germination
- Cause: old seeds or wrong temp.
- Fix: check packet dates and give proper warmth.
- Pests
- Cause: fungus gnats thrive in wet soil.
- Fix: let surface dry, use sticky traps, and clean trays.
Personal tips, lessons learned, and mistakes to avoid in this seed starting guide
I learned from years of trial and error. These simple moves cut losses and save time.
- Start small the first year. I once overfilled a garage with trays. It was hard to care for them all.
- Label clearly. I mixed two tomato varieties once. Never again.
- Use timers for lights. I saved hours and kept plants consistent with a cheap timer.
- Avoid fertilizer for the first two weeks. Young seedlings do fine on stored seed food.
- Reuse trays, but sanitize them between seasons. Rinse with a mild bleach solution.
Mistakes to avoid:
- Starting seeds on a sunny windowsill without extra light.
- Overpotting: large pots hold too much moisture for little roots.
- Skipping hardening off. Seedlings need time to adapt.

Frequently Asked Questions of seed starting guide
How long does it take for seeds to sprout?
Most seeds sprout in 3 to 14 days. Some, like carrots, can take longer, up to 21 days.
Do I need grow lights to start seeds?
Grow lights are highly recommended. A sunny window often gives uneven light and long, weak seedlings.
When should I transplant seedlings outside?
Transplant after the last frost risk and once seedlings have 2 to 4 true leaves. Harden off for at least a week.
Can I reuse seed-starting mix?
You can, but refresh it. Sterilize and add fresh mix or compost to avoid disease and nutrient depletion.
How often should I water seedlings?
Check daily. Water when the top layer feels just dry. Avoid letting soil dry fully or stay soggy.
What seeds are best for beginners?
Try tomatoes, lettuce, basil, and marigolds. They are forgiving and grow fast from seed.

Conclusion
This seed starting guide gives clear steps to start seeds and grow healthy plants. Follow simple rules: right timing, good mix, steady light, and proper care. Start small, keep notes, and learn from each batch.
Take action now: pick a few easy seeds, set a start date, and try one full cycle this season. Share your wins or questions below and subscribe for more tips on growing strong plants.